

Installing picture moulding is a classic and elegant way to add architectural interest and sophistication to any room. Whether you’re looking to create a gallery wall, frame a large piece of artwork, or simply add some decorative trim, picture moulding is a versatile and budget-friendly solution that can elevate the look of your space. But if you’ve never installed it before, the process can seem daunting. That’s where I come in! 🙂 I’m here to tell you, it is easier than you think! In this step-by-step guide, I will walk you through everything you need to know to install picture moulding like a pro, from measuring and cutting to nailing and finishing.
*This post contains affiliate links. Please see full affiliate disclosure here.
What you need to do the job
Materials:
- Picture Mould (I used this one from Lowe’s)
- Wood Filler of your choice
- Caulking
- Starbond CA Glue
- Frog Tape (For delicate surfaces)
Tools:
- Miter Saw for mitered cuts (you can also use a table saw, a circular saw, or miter shears – as long as you have some sort of saw to make accurate 45 degree cuts)
- Brad Nailer
A reminder – it doesn’t matter what brand of tools you use, as long as they work! 🙂 Don’t let that stop you from trying!
Measure out your Space
The first thing you want to do for an accent wall is measure out the space to know what you’re working with. Remember, walls are never perfect so keep that in mind as you measure. It never hurts to double-check, either. You don’t want your design to look like it’s off.
I measured top to bottom on 3 different areas – where the walls meet vertically, and then from left to right (or horizontally) at the top and at the bottom of the wall. Based off those measurements, I made this sketch.

I am a visual person. One of the most helpful “tools” to visualize something I’m about to work on, is painter’s tape! After I painted the walls, I waited about a week before I put delicate painter’s tape on the walls (I usually use Frog Tape). I wanted to be able to visualize at what height the chair rail would be and how far apart I wanted to space each box. It didn’t take too long for me to decide. In fact I only taped out the area of the chair rail as well as the box on the bottom.

I know, it’s kind of hard to tell from this picture what the design looked like with the tape, but I was trying to work on this while my daughter was at school, when I had time to, so I had to keep moving her furniture back and that got old really fast. Hehe! This is the best picture I could find. You get the point though, right? 🙂
Installing the Chair Rail
I decided to start with installing the chair rail that was going to go across the 2 walls first. Reason being is that this area is actually 2 walls and I needed to figure out what angle to miter my cuts for my trim to fit. That was probably the hardest part of this whole DIY. The smaller wall is at 20 degrees. I didn’t know that at the time. I knew there was an angle but had no clue how to figure it out. So I called my Tio and he basically told me it would be a trial and error. He told me to start at about 15 degrees and go up from there.
I didn’t want to ruin or waste any of the precious chair rail so I took scraps of plywood I had and used the scraps as “practice” pieces to make my test miter cuts until I found the perfect miter at 20 degrees!


You know that saying – it’s all in the details? Well, it really is. 🙂 As I sat there thinking about how I was going to have the ends of the chair rail end where the wall ended I thought to myself – how am I gonna make it look like it’s not just a chopped piece of trim? Ah. . . and that is where a “return edge” comes in.
Making a Return Edge
A return edge is actually really simple to do! All it is, is a small piece of trim you put on the end of the larger piece to make the edges look more finished. Like this. . .

Ok this isn’t my best work ever but it makes a difference compared to something like this, right?

See? The return edge is much nicer right? And it’s so easy! Here’s what you do. 🙂

Use CA glue and attach this small piece to main piece of trim which also has a 45 degree mitered cut.

One side of the trim gets the main glue, the other side gets the accelerator.


And then you put it together! Just keep in mind CA glue cures really fast so you want to be as accurate as possible when placing your pieces together to glue or else they will glue unevenly. I posted a reel on Instagram about this process here.
Another thing my Tio suggested was that I pre-assemble my trim before installing it on the wall. This is a step you can choose to skip if you’d like, and just nail your trim directly on to the wall. The reason I chose to pre-assemble is because as mentioned before, I was working on this during the short pockets of time I was free during the day and really, tried working on as much as I could during the night while my daughter slept. Pre-assembling made sense for me because at night I could put my boxes together and the next day I could run up to my daughter’s room and quickly nail a box to the wall. You can watch the reel about pre-assembling here.

I literally built a box a day. 🙂 So needless to say it took me about a week to get this install done. The hardest part was the area where the wall is angled but after lots of trial and error I got it!

Finish Work and Paint
Finish work – the wood filling and caulking part is not my favorite but it makes your work look so beautiful! After this step, my little girl and I decided to paint the trim white. Originally we had decided to go all pink but seeing the white trim against the pink wall made us change our mind! Painting it was a lot more work than I thought – lots of taping! But it was definitely worth it!


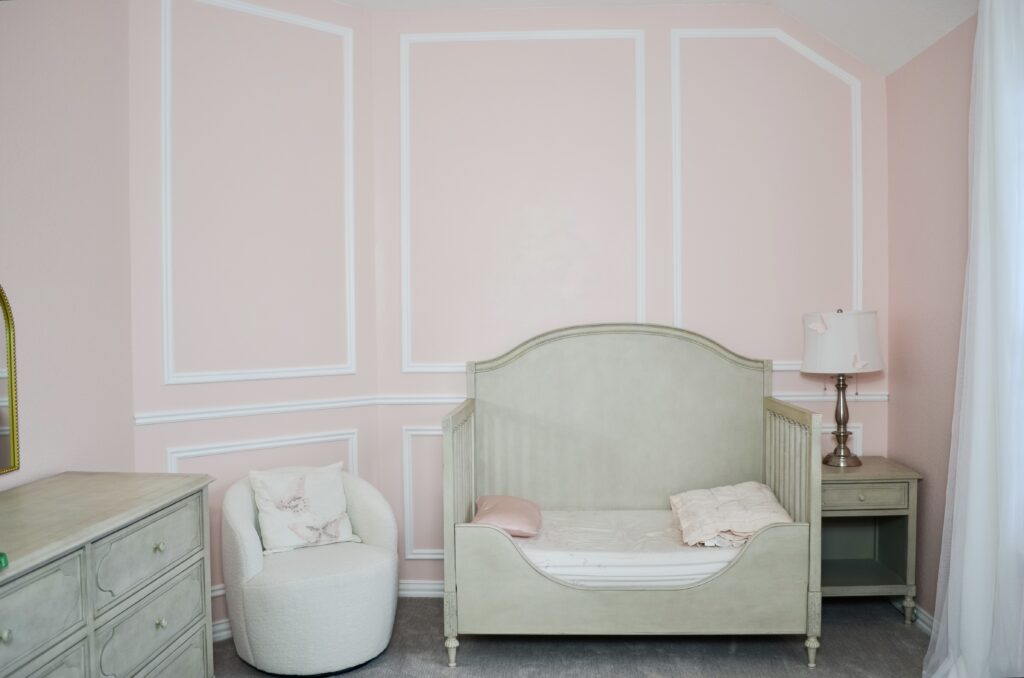
Final Reveal
And now the grand finale. . . I did it! I am so so proud of how my daughter’s bedroom turned out. She loves it so much and I’m so happy I was able to do this for her. What do you think?


Hope this tutorial was helpful for you!
For more inspo for accent walls you can read about how I installed a beadboard accent wall at my sister’s house. You can also read all about how I made that Anthropolgie Primrose Dupe or how I skim coated the wall prior to installing the trim. As always please feel free to reach out with any other questions! Happy DIYing!


