

Y’all. If you have ever spent a Saturday afternoon spreading fresh mulch in your flower beds, only to look out the window two months later and wonder where on earth all of it went, this post is for you.
I have asked myself that exact question more times than I can count. I would lay down beautiful, dark, fluffy mulch in the spring, and by mid-summer my flower beds looked patchy and sad. The mulch was somehow on my driveway, on the sidewalk, stuck to the bottom of my kid’s shoes, and tracked all over my kitchen floor. Where was it actually going? I had a hunch the leaf blower was a big part of the problem, plus a few good Texas thunderstorms.
Then I discovered mulch glue. And here’s the thing, I was skeptical at first. Glue? On mulch? In my flower beds? It sounded like one of those Pinterest hacks that looks great in the video and falls apart in real life. But I tried it, and now I will not do a mulch refresh without it. So today I want to walk you through exactly what mulch glue is, how it works, whether it is actually worth the money, and how I used it on my own flower beds.
*This post contains affiliate links. Please see full affiliate disclosure here.
What Is Mulch Glue?
Mulch glue is exactly what it sounds like. It is a liquid adhesive you spray over the top of your mulch to lock it in place. Once it dries, it forms a thin, flexible bond that holds your mulch pieces together so they do not blow, wash, or get tracked away.
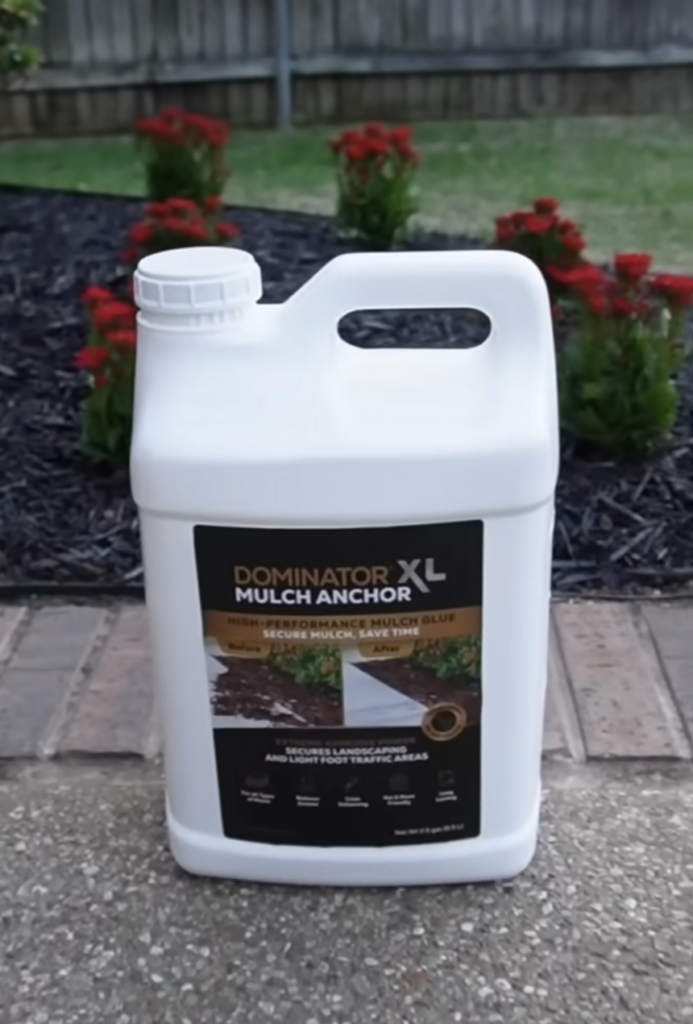
The product I used, and the one I recommend, is Dominator Mulch Anchor from Lowe’s. I partnered with BDC Brands on this project, but I would not be writing about this stuff if I did not love it. It is a water-based, non-toxic formula that is safe around kids, pets, and your plants. That part was a big deal for me. I have a yard full of running children and at least one curious dog at any given time, and I am not going to spray something sketchy all over my landscaping.
Once the glue is dry, water still passes right through it. So your plants are still getting hydrated, your mulch is still doing its job of retaining moisture and regulating soil temperature, and the whole bed just stays put. It is honestly a little bit magical.
Why I Decided to Try Mulch Glue
This year I decided to plant my own flowers in my flower beds instead of paying someone to do it for me. I picked out the plants, I dug the holes, I worked the soil, and I laid the mulch. I was proud of the whole thing. So when I started thinking about how much of that mulch was going to disappear by August, I got annoyed before it even happened.
Here is the math that finally pushed me over the edge. Mulch is not free. A bag of decent hardwood mulch runs anywhere from $4 to $7, and most beds need a bunch of bags. If half of it ends up on my driveway by mid-summer, I am essentially throwing money in the trash. Add in the time it takes to spread it, and the frustration of watching it scatter across the yard every time the lawn guy fires up the leaf blower, and yeah. I was ready for a solution.
I had heard about mulch glue floating around DIY corners of the internet for a while, but I wanted to actually test it on my own beds before I told y’all about it. So that is what I did.
How Mulch Glue Works
The application process is honestly so simple I felt a little silly for waiting this long to try it. Here is the breakdown.
What You Need
- Dominator Mulch Anchor (one bottle goes a long way)
- A garden sprayer (the kind you pump to pressurize)
- Fresh mulch already laid down in your flower beds
- A dry day with no rain in the forecast for at least a few hours
Step by Step
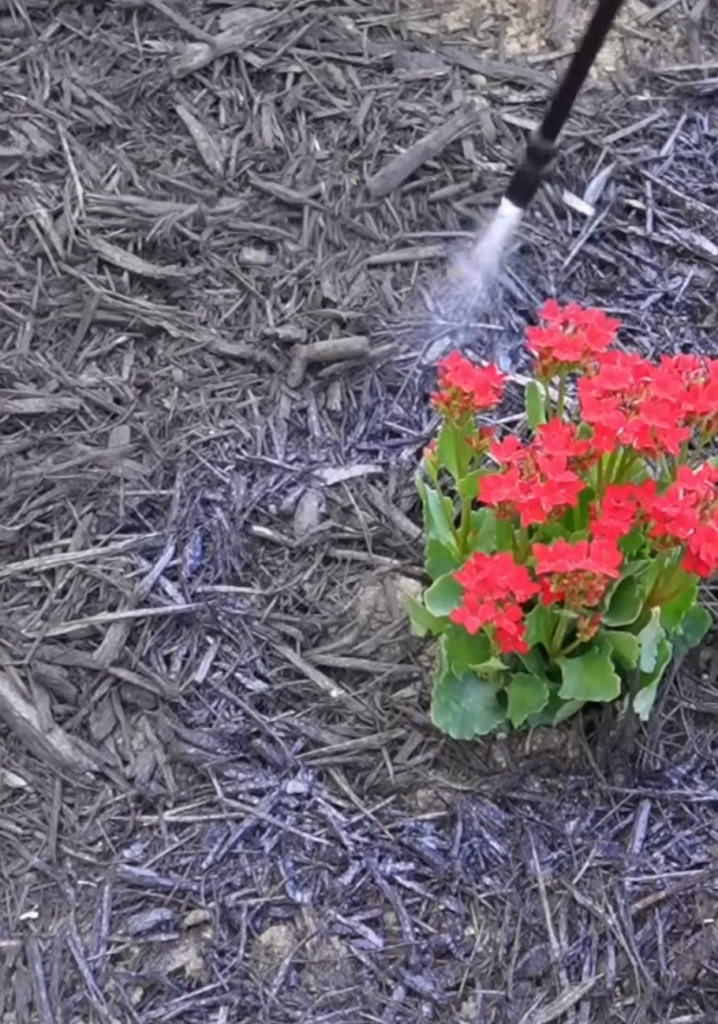
1. Lay your mulch first. Get your beds looking the way you want them. Spread the mulch evenly, fluff it up, and make sure your edges look clean. The glue is not going to fix a sloppy mulch job, it is going to lock it in. So make it pretty before you spray.
2. Pour the mulch glue into your sprayer. If you have never used a garden sprayer before, do not let it intimidate you. They are honestly the easiest thing in the world. You unscrew the top, pour your liquid in, screw it back on, and pump the handle a few times to pressurize it. That pressure is what pushes the glue out through the wand when you squeeze the trigger.
3. Pump until the glue reaches the tip. Give it a few good pumps. You want to make sure the glue actually makes it all the way to the spray nozzle before you start. Otherwise you will be standing there squeezing the trigger wondering why nothing is happening.
4. Apply two to three light layers. This is the part that surprised me. You do not soak the mulch in one heavy pass. You do light, even layers. I did two layers on every flower bed. Think of it like spray painting, where light coats give you a better, more even result than one heavy coat.
5. Wait an hour between layers. Patience pays off here. I waited a full hour between my first and second layer to give each coat time to dry. If you rush it, the glue does not bond properly and you have wasted product.
6. Let it cure. After your final layer, give it a few hours to fully dry before any rain or heavy watering. Once it is set, you are good to go.
That is the whole process. No special tools, mixing, or mess. If you can spray a hose, you can apply mulch glue.
Cleanup Is Ridiculously Easy
Because Dominator Mulch Anchor is water-based, cleanup is genuinely the easiest part. I poured the leftover glue back into the bottle (it is still good for next time, do not throw it out), and then I rinsed my sprayer with plain water.
This part is important. If you are planning to use your garden sprayer again, run water through it right after you finish. Like, do not put it in the garage and forget about it. The glue can dry inside the sprayer and gunk up the nozzle, and then you have a stuck sprayer and a bad day. Five minutes of rinsing now saves you a brand new sprayer later.
Does Mulch Glue Actually Hold Up?
This was the real test. Pretty application is one thing. But does it work?
Short answer: yes.
A few days after I sprayed my beds, we got hit with five straight days of rain. Five. In a row. Texas weather can be wild, and I was honestly nervous that the glue would wash right out and I would be stuck with mushy, scattered mulch. Nope. Every single bed stayed put. The mulch did not float, did not migrate, did not end up in piles at the bottom of the slope. It just stayed exactly where I put it.
Then I got curious and decided to push it harder. I had my son grab the leaf blower and aim it directly at the flower beds. This is the same leaf blower that, in years past, has scattered mulch halfway across the lawn. The mulch barely moved. A few tiny pieces shifted on the very surface, but the bulk of it held strong.
That was the moment I was sold. If it can survive five days of rain and a leaf blower attack, it can handle a normal summer.
Is Mulch Glue Worth It?
Okay so here is the big question. Is mulch glue actually worth the money?
For me, the answer is a hard yes, and here is why.
1. It saves you money on mulch. If your mulch stays put, you do not have to buy as much mulch next season. One bottle of mulch glue costs less than the bags of mulch you would have to replace.
2. It saves you time. No more raking mulch back into the beds every weekend, sweeping the driveway, or tracking it inside the house.
3. Your beds look better, longer. Mulch glue keeps that fresh, just-mulched look for the entire season instead of just the first few weeks.
4. It is safe around kids, pets, and plants. This was non-negotiable for me. Dominator Mulch Anchor is non-toxic and water permeable, so I never had to worry about my kids playing in the yard or my plants being harmed.
5. It is genuinely easy to use. If you can pour liquid into a sprayer and squeeze a trigger, you can do this. There is no learning curve.
The only situation where I would say maybe skip it is if you have a really tiny bed with cheap mulch that you do not really care about. But for anyone who has invested in nice hardwood mulch, or anyone who is tired of the constant re-mulching cycle, it pays for itself.
Tips From My Own Project
A few things I learned along the way that might save you some trial and error:
- Apply on a calm day. Wind and spray bottles are not friends. You will end up with mulch glue on your patio furniture if it is gusty.
- Wear old clothes and shoes. The glue dries clear and is non-toxic, but I would not wear my favorite white sneakers for this job.
- Watch the forecast. You want at least a few hours of dry weather after your last layer before any rain or sprinklers kick on.
- Do not skip the second layer. I know it is tempting to just blast one heavy coat and call it done. Light coats work better. Trust the process.
- Do edges and high-traffic spots a little heavier. The corners of beds near walkways or driveways take the most abuse, so a little extra coverage there pays off.
Where to Buy Mulch Glue
I picked up Dominator Mulch Anchor at Lowe’s, and it is also available online. I also grabbed this garden sprayer because the one I had was on its last legs. Both are linked below if you want to grab the same setup I used.
Tools and supplies I used:
Mulch Glue FAQ
Most mulch glues, including Dominator Mulch Anchor, last a full season. You may want to reapply at the start of the next growing season when you refresh your mulch.
Nope. Dominator Mulch Anchor is water permeable, which means water still passes through to your soil and roots. It is also non-toxic, so it is safe around your plants, pets, and kids.
Some mulch glues are formulated for rocks and gravel as well. Always check the label of the specific product you are using to make sure it is rated for the material you have in your beds.
Coverage depends on the brand. The bottle will tell you how many square feet it covers. I suggest measuring your beds before you head to the store so you only buy what you need.
Yes. Once it is fully cured, you cannot see it. Your mulch looks exactly the same, just locked in place.
Wait until it is fully dry, usually a few hours after the final layer. After that, you can walk on it like normal. It will not crack or break apart underfoot.
Final Thoughts
If you have been on the fence about mulch glue, this is your sign to go for it. I was a skeptic, and now I am a full convert. My flower beds still look fresh weeks after I sprayed them, my driveway is not a disaster, and I am not constantly raking mulch back into place. For a product that costs less than a few bags of mulch, the time and money it saves is genuinely worth it.
Watch the full walkthrough on my YouTube channel to see exactly how I did it, and grab Dominator Mulch Anchor here if you want to try it for yourself.
If you give mulch glue a try this season, come back and let me know how it worked for you. I would love to hear about your project.
As always, happy DIYing.


