

There’s nothing quite like a fireplace to make a room feel warm, inviting, and finished. But what if your home doesn’t have one? The good news is you can build your own, and it’s easier than you might think. A small fireplace with an electric insert can be built as a DIY project over a weekend, and the results are incredible.
I recently built one for a friend, and I’m going to walk you through every step. From moving outlets and building the frame, to finishing with drywall, trim, and a custom mantel, this tutorial covers it all. By the end, you’ll know exactly how to build a fireplace wall that looks like it’s always been part of the house.
Why Choose an Electric Fireplace?
Electric inserts are one of the easiest ways to add a fireplace to your home. They don’t require chimneys, vents, or gas lines, and they’ve become surprisingly realistic. The insert I used had multiple flame colors, adjustable heat, and a remote control. Even better, you can switch off the heat and use it purely for ambiance during warmer months.
A small electric fireplace also gives you flexibility. It creates a cozy focal point without overwhelming your room, and you can design the frame and mantel to suit your personal style.
Planning Your Build
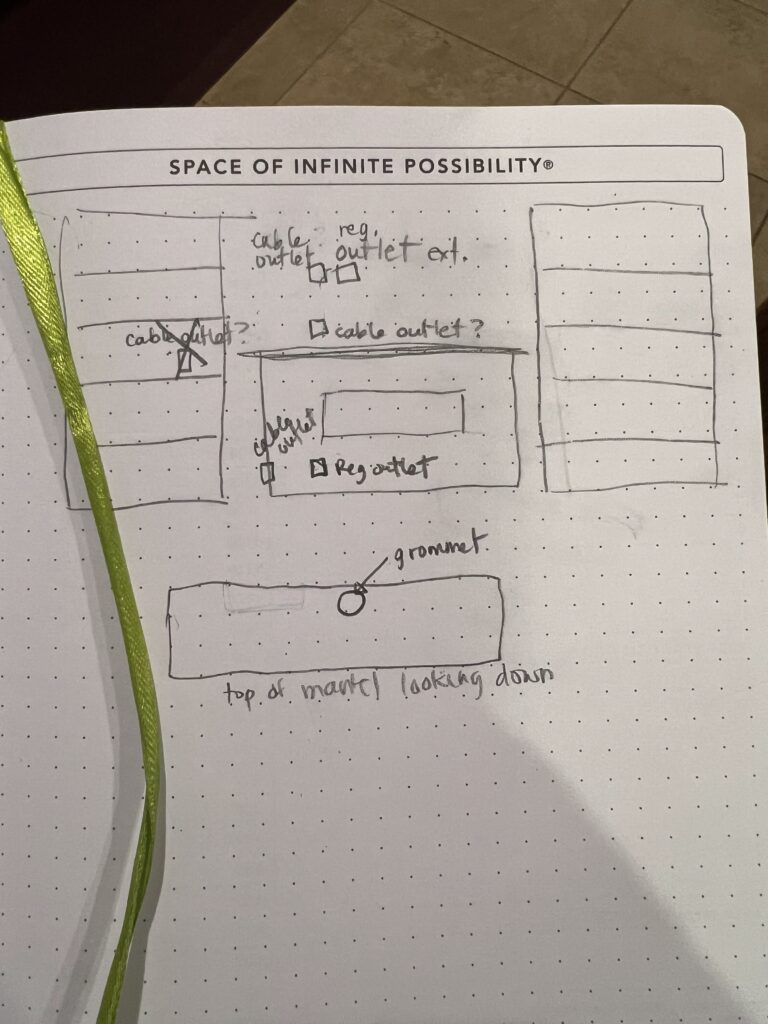
Before you pick up a saw, there are two big things to plan: power and placement.
The fireplace insert needs its own outlet, ideally positioned so the cord is hidden. In this case, I raised the outlet higher on the wall so both the insert and the TV above it could plug in invisibly. You will also need to make sure your outlet has enough amps, to support the amount of electricity that is going to be required to run the fireplace efficiently.
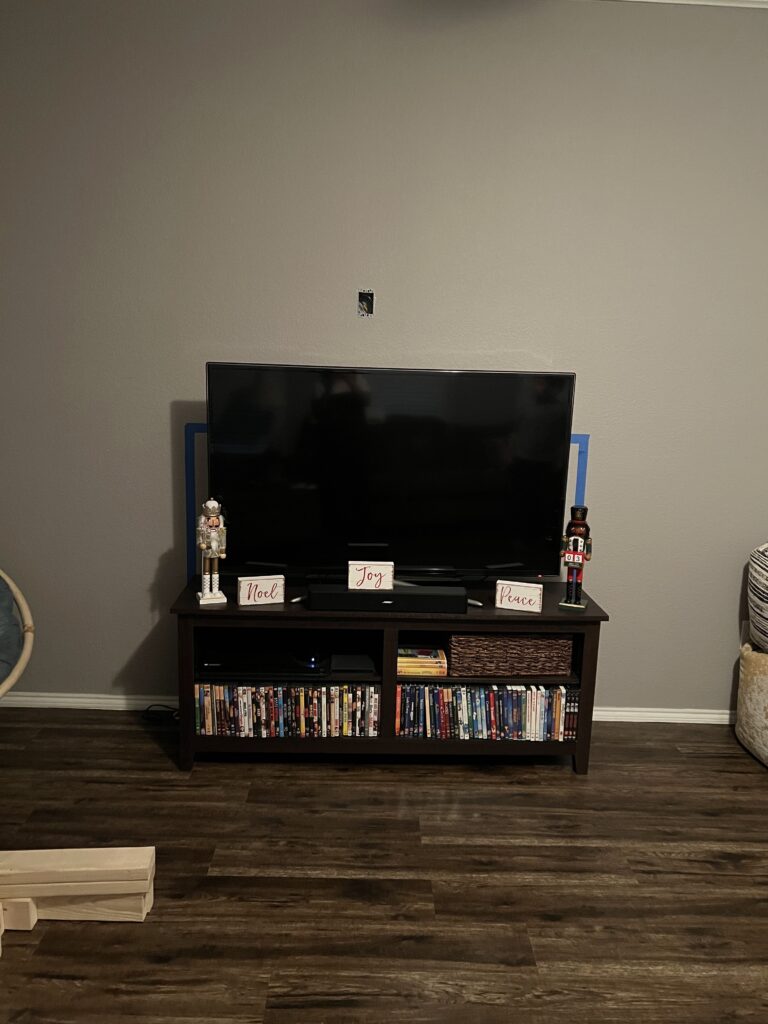
Then comes scale. A fireplace that’s too large can dominate the room, while one that’s too small may feel like an afterthought. I used painter’s tape to mark the dimensions on the wall first. The finished version took up about a third of the wall and didn’t reach the ceiling, which gave it presence without taking over.
Tools and Supplies
Here’s everything I used to complete the build, with links so you can shop the same items:
Power Tools
- Dewalt Drill
- Dewalt Driver
- Montana 4-in-1 Drill/Driver Countersink
- Dewalt Multi-Tool
- Kobalt Cordless 4 ½” Circular Saw
- Bosch Miter Saw
- SawStop Compact Table Saw
- Mirka Sander
Electrical Supplies
Framing and Drywall
- Standard 2×4 Lumber
- Fire-Rated Drywall
- Corner Bead
- Paper Tape for Joints
- Easy Sand 20
- Dust Control Joint Compound
- 10” Drywall Knife
- 4” Drywall Knife
Finishing
- Fusion Mineral Paint (Algonquin)
- Minwax Special Walnut Stain
- Polycrylic Topcoat
- Clamps
- Crafstman Level
Fireplace Insert
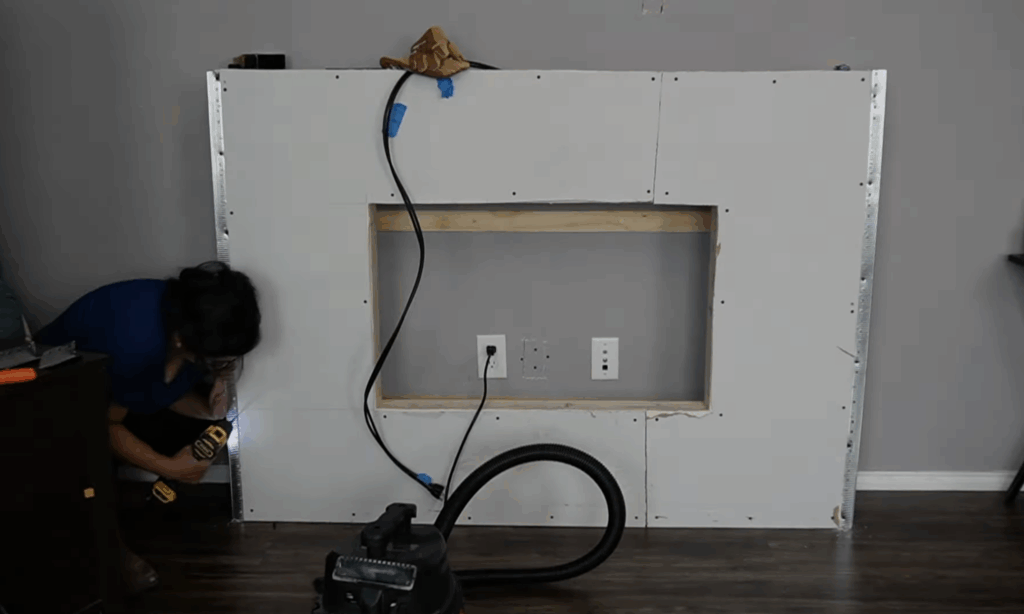
Step One: Moving the Outlet
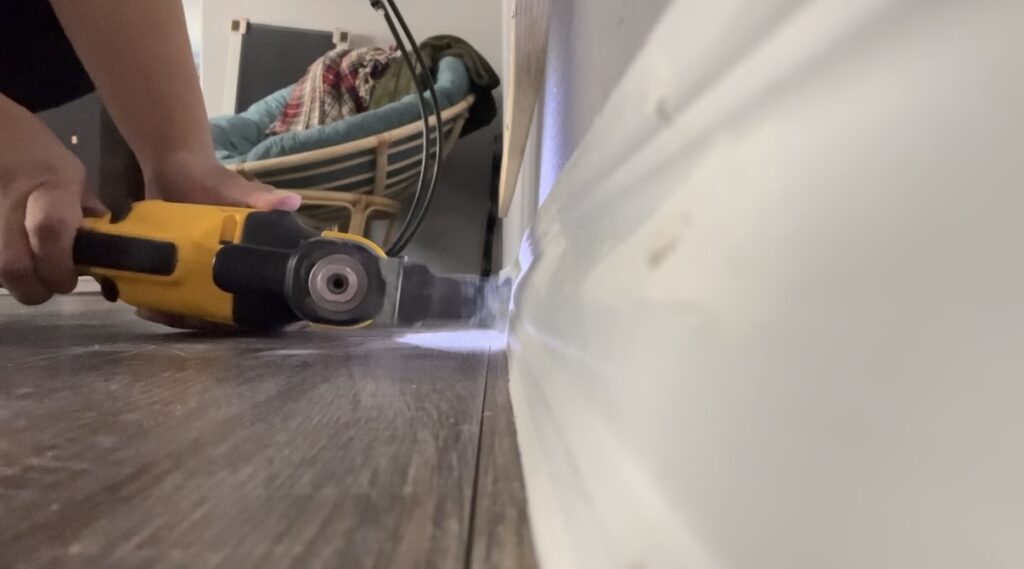
I started by switching off the power at the breaker and cutting into the wall using my Dewalt Multi-Tool. This allowed me to create a neat opening for the new wiring. Because the electric fireplace and TV would both sit against this wall, I needed the outlet positioned higher to keep cords completely hidden.
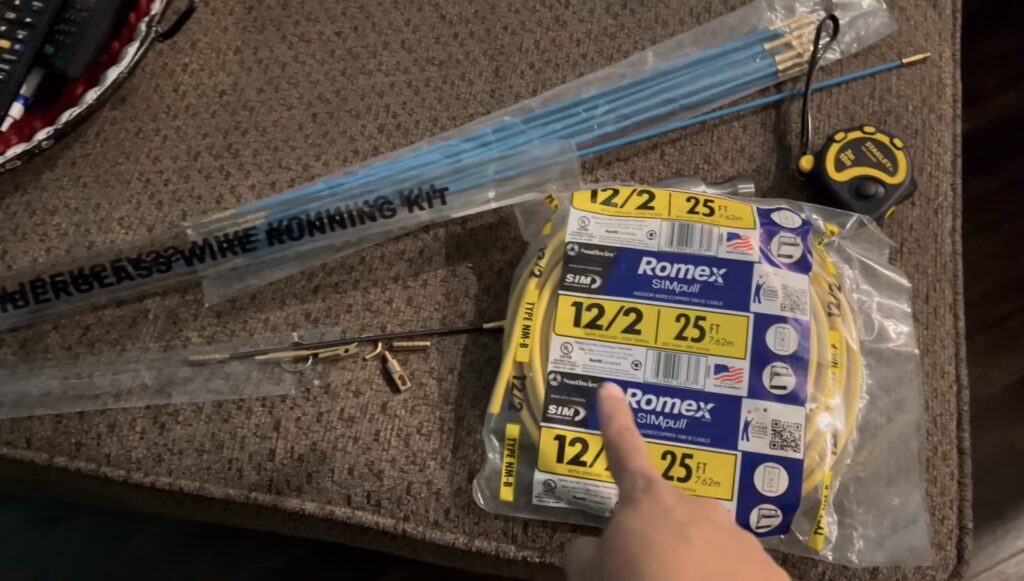
Running new electrical isn’t difficult, but it does require patience. I used Romex 12/2 Wire and a fish stick kit to pull the cable up from the existing outlet to the new location. The process took almost four hours, mostly because fishing wire through insulated walls can be tricky, you have to work slowly to avoid damaging anything behind the drywall.
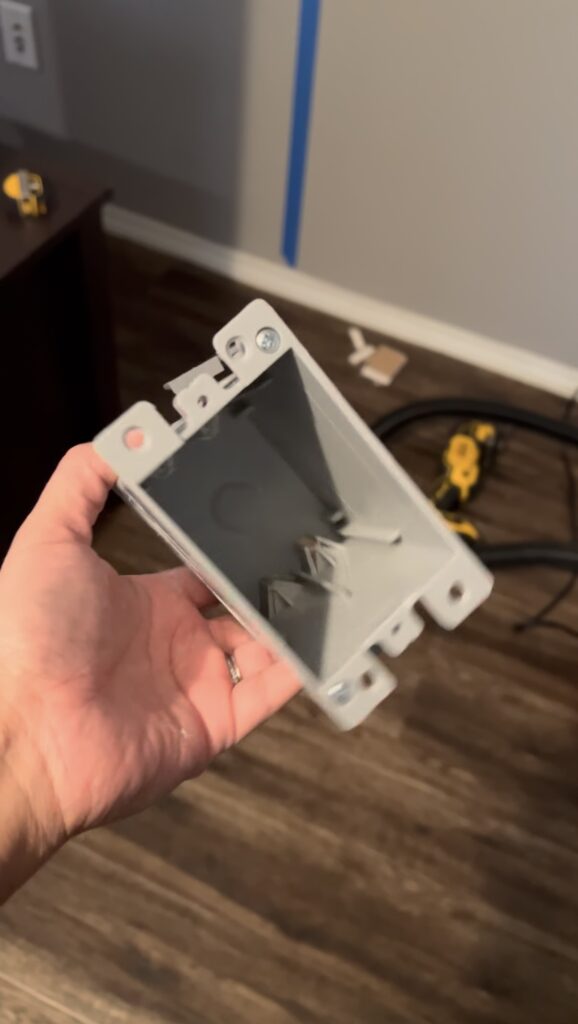
Once the new wire was in place, I installed an Old Work Electrical Box and secured everything properly. Before moving on, I double-checked that the outlet was live and properly grounded using a voltage tester.
This small step made a big difference in the final look. By raising the outlet, I was able to hide all visible cords and create a clean, built-in aesthetic for both the fireplace and the TV above it. With the electrical sorted, the wall was finally ready for framing.
Step Two: Building the Frame
With the electrical complete, it was time to create the skeleton of the fireplace, the part that gives it structure and shape.
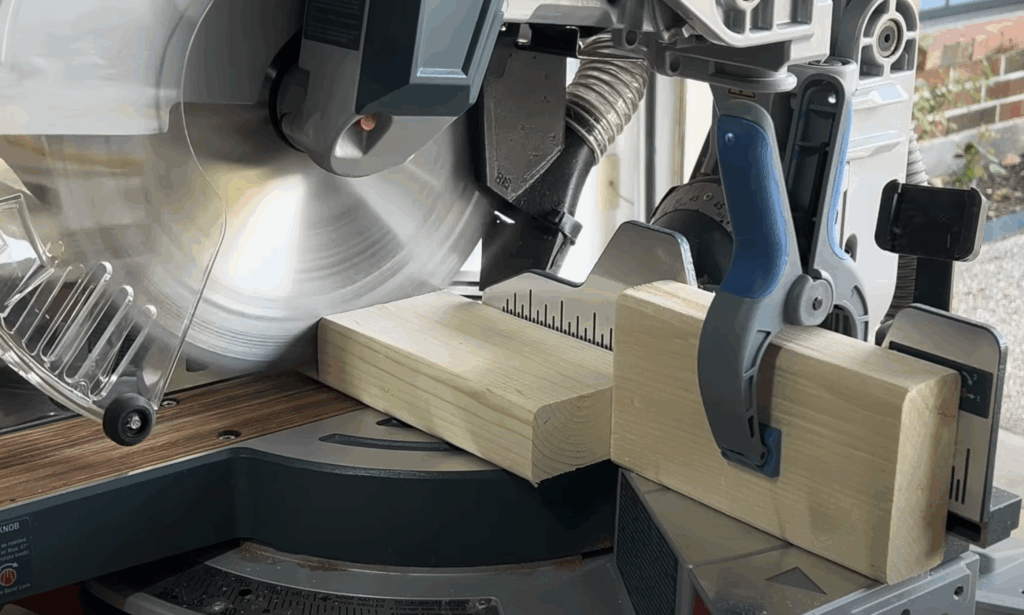
I built most of the frame at home using 2×4 lumber and my Bosch Miter Saw, which made all the angled cuts clean and consistent. Pre-assembling sections ahead of time saved a ton of effort once I got to my friend’s house. If you’re building a similar project, it’s a great way to streamline the on-site setup, especially if you don’t want to haul every single tool with you.
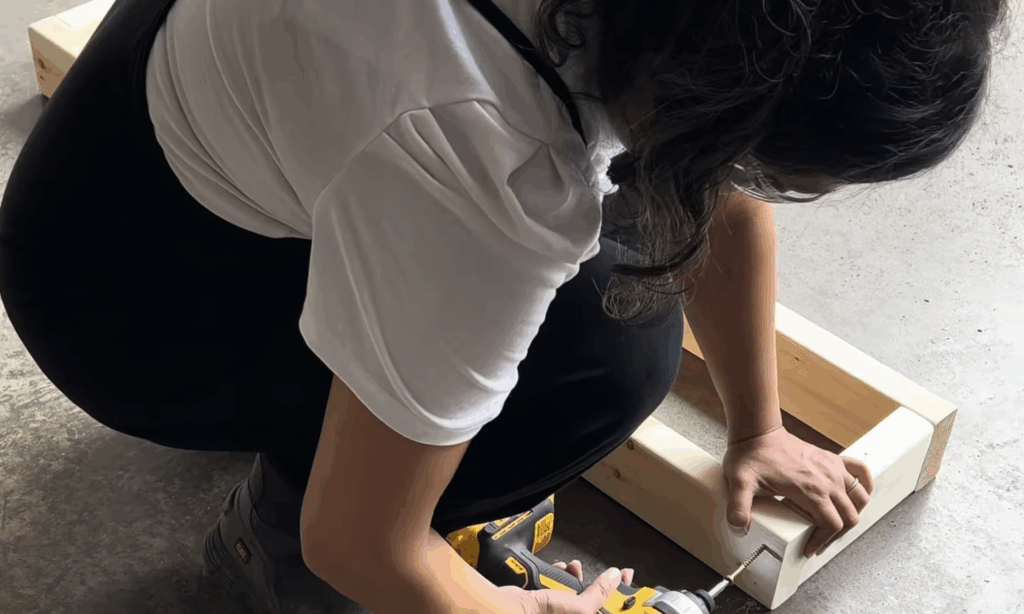
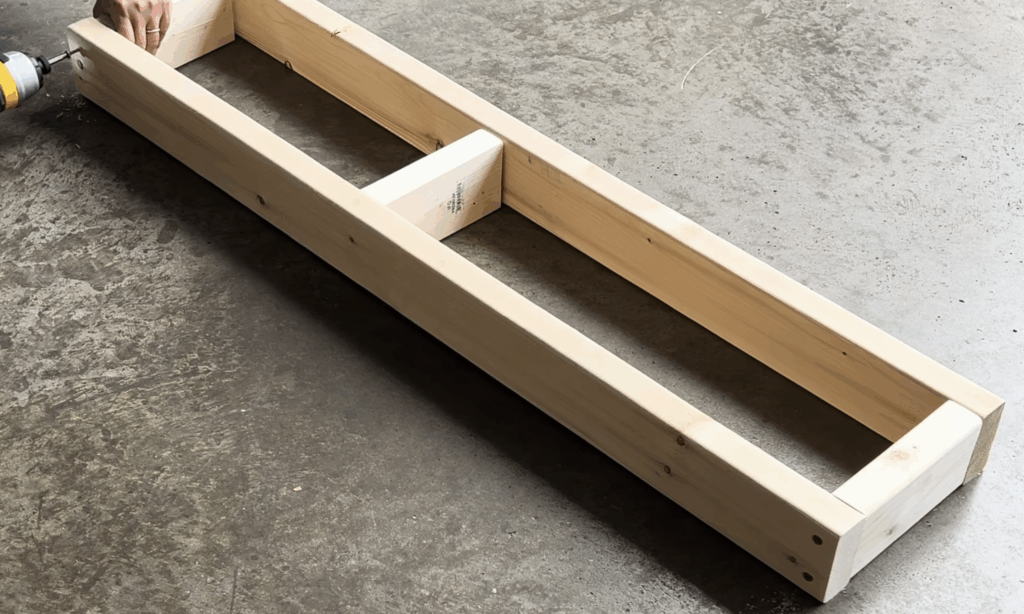
Once I arrived, I anchored the frame directly to the wall studs. Since studs never seem to line up exactly where you want them, I used scrap wood to bridge any gaps and give myself solid attachment points. It’s a small step that adds a lot of stability, especially important for something that’s going to support both a fireplace insert and a mantel.I checked everything with my Craftsman Level as I went to make sure each section was square and plumb. The top piece of framing is especially critical because the mantel will eventually sit right on top of it, and even a small tilt will be obvious once everything is finished.

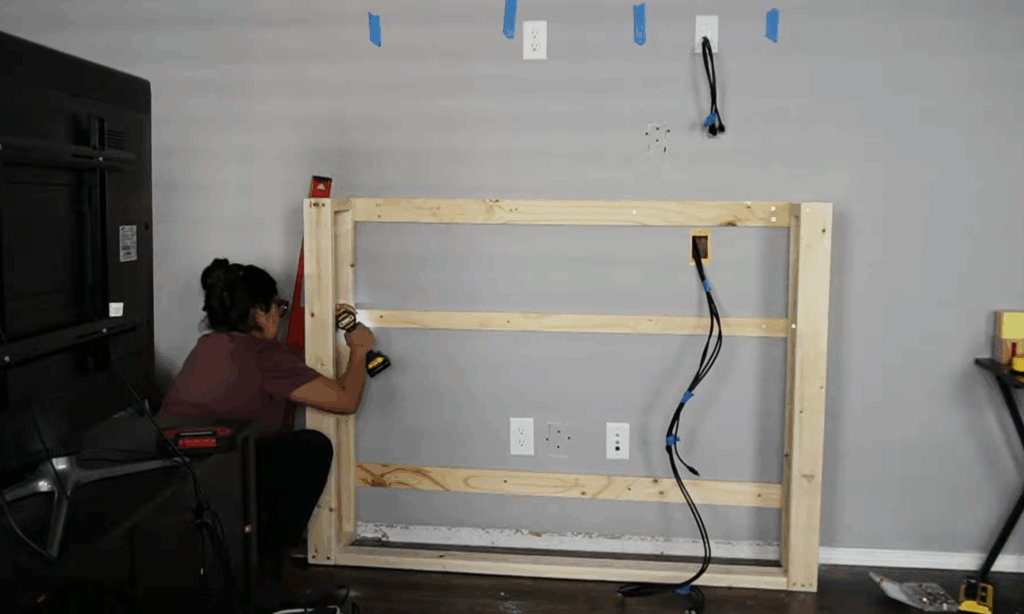
To make the frame sit flush against the wall, I cut away the existing baseboards using my Dewalt Multi-Tool. It wasn’t the prettiest part of the job, but it worked perfectly. I’ve learned that when it comes to DIY, it’s better to take your time on the prep work, having a solid, even frame at this stage makes every step afterward smoother.
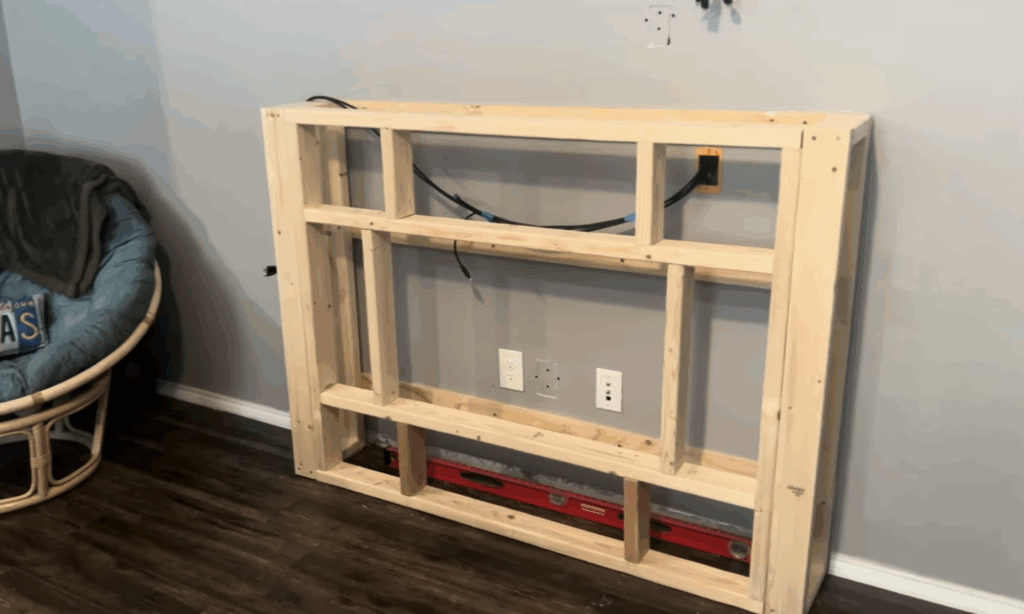
Once the framing was in place, the fireplace was starting to take shape. You could finally see where the insert would go, and it instantly gave the room a sense of balance and design.
Step Three: Installing Drywall
With the frame finished, it was time to cover everything with drywall and turn the structure into a solid, built-in feature. I used Fire-Rated Drywall for this step, not because it’s required for an electric fireplace, but because I like the added peace of mind. It’s designed to withstand heat better than standard drywall, and the price difference is minimal.
I cut the sheets to size using a sharp utility knife instead of a power tool. This takes a little longer, but it helps keep dust to a minimum, especially when working inside someone’s home. Once the panels were fitted, I attached them to the 2×4 frame with drywall screws.
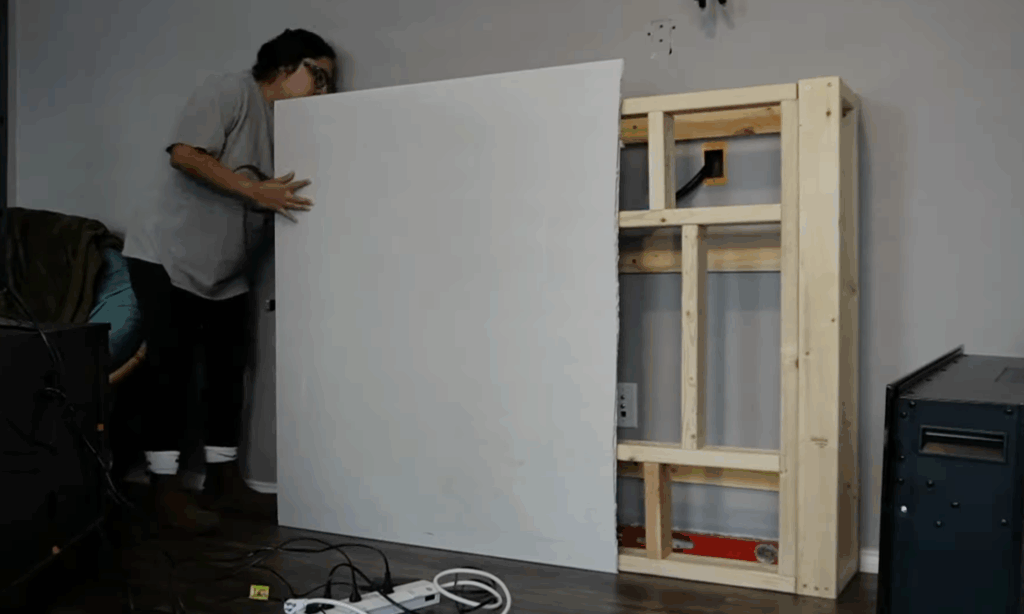
For the corners, I used Corner Bead to protect the edges and give the fireplace clean, crisp lines. I cut the metal bead to length with tin snips and screwed it into place on both sides.
One quick note: wear gloves during this step. The fiberglass inside the fire-rated drywall can leave tiny splinters on your hands, and it’s not pleasant. I learned that the hard way, my hands were itching for hours until I realized it was from the microscopic fibers.
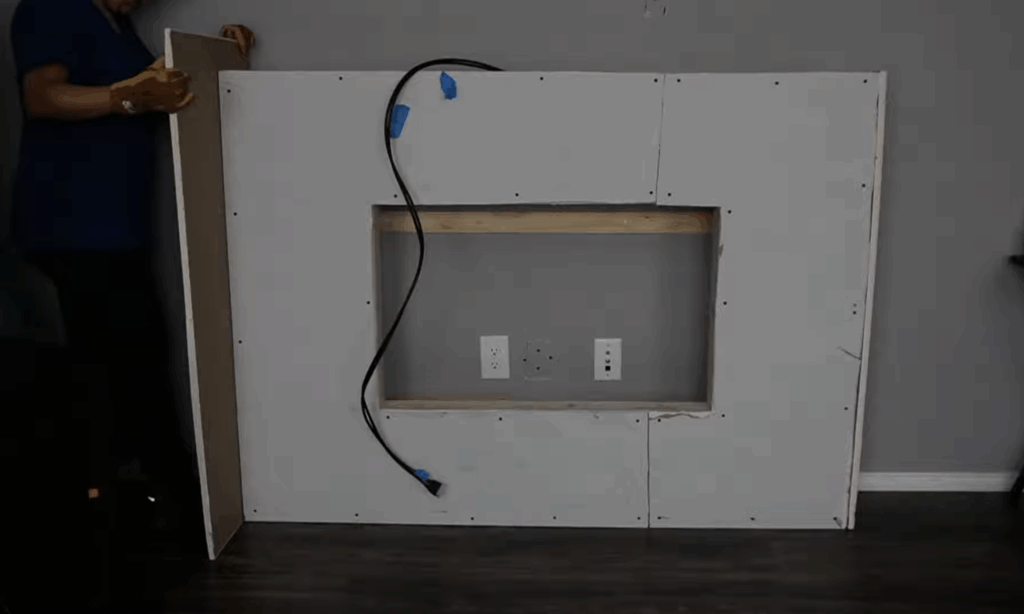
When all the drywall was secured and the corners reinforced, the fireplace finally looked like part of the house instead of a construction project. Next up: mudding and sanding, everyone’s least favorite part, but one that makes all the difference in creating a smooth, professional finish.
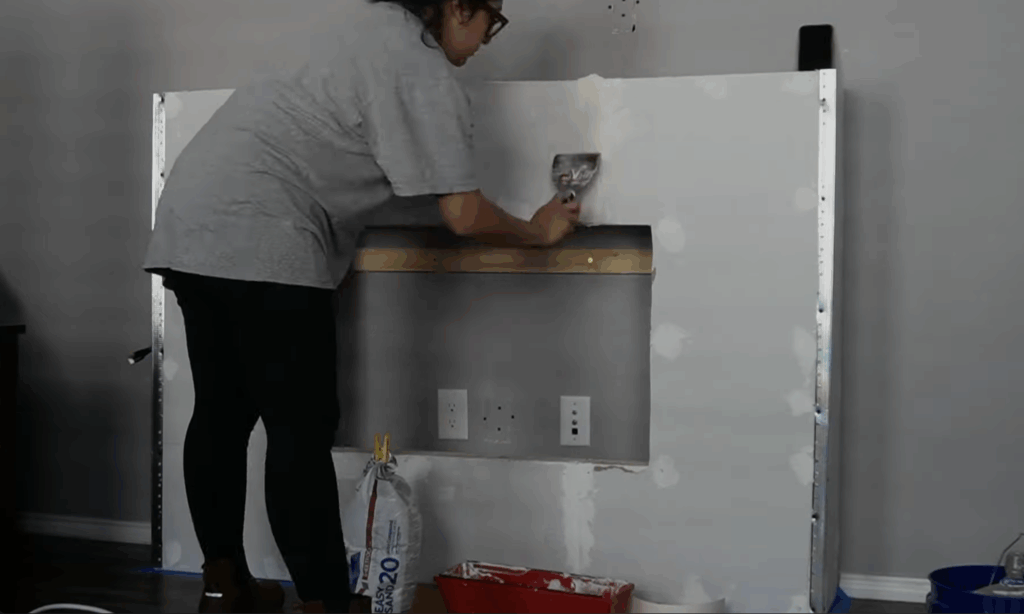
Step Four: Mudding and Sanding
Ah, mudding. It’s easily one of the least glamorous parts of any DIY project, but it’s what turns a basic drywall structure into a professional-looking feature. This stage is messy, time-consuming, and absolutely worth the effort.
I started by filling all the screw holes and joints with Easy Sand 20. It sets up fairly quickly, so it’s great for that first pass where you just want to smooth out all the uneven spots. Once it dried, I used Paper Joint Tape over the seams and applied a layer of all-purpose joint compound to cover the tape and corners.
When the first coat had dried completely, I gave everything a light sand using my Mirka Sander. This is one of those tools that makes the job so much easier, it keeps the surface consistent without gouging the drywall like hand sanding sometimes can.
For the second coat, I switched to Dust-Control Joint Compound. It’s a little pricier, but honestly, it’s a game-changer. It creates far less airborne dust when you sand, and it doesn’t bubble or shrink as much as standard compound. Two smooth coats later, the entire fireplace wall looked completely seamless and ready for finishing.
If you’ve never done drywall before, here’s a quick tip: don’t rush it. Each layer needs to dry fully before sanding or adding the next coat. It takes patience, but the smoother your surface, the better your paint and trim will look later.
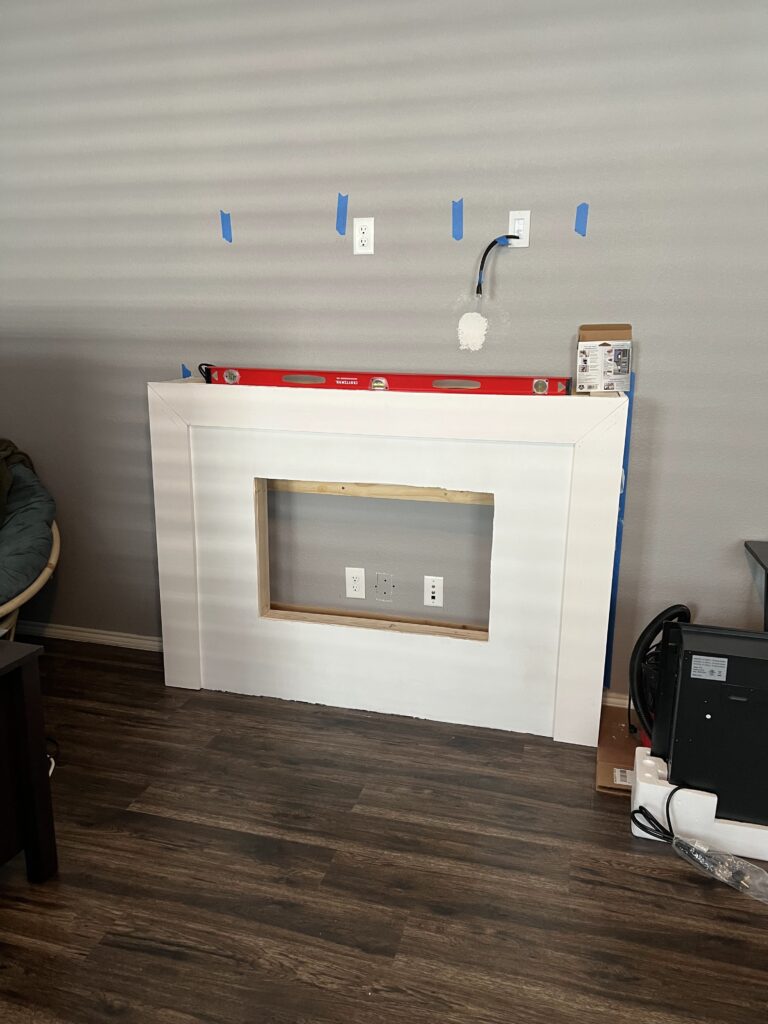
Step Five: Adding Trim
With the mudding behind me, it was finally time for one of my favorite parts, trim work. Adding trim gives structure and polish to any build, and it’s what makes a project look intentional and built-in.
I used 1×6 pine boards to frame the fireplace opening. The size gave it just the right amount of dimension without feeling bulky. My brad nailer made attaching the boards quick and easy, and I checked alignment with my Craftsman Level as I went to keep everything perfectly straight.
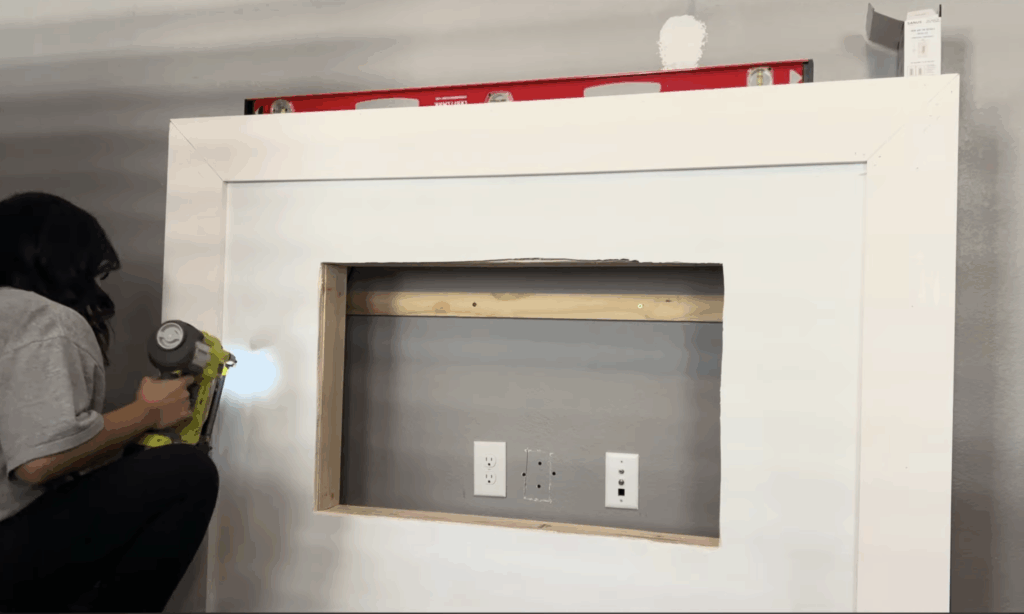
After all the boards were secured, I filled the nail holes with wood filler and ran a clean bead of caulk along the seams. Once dry, I painted the trim to match the wall. It’s a small detail that ties everything together, and while it’s not the most dramatic step, it’s what takes the fireplace from looking “DIY” to looking like it was always part of the home.
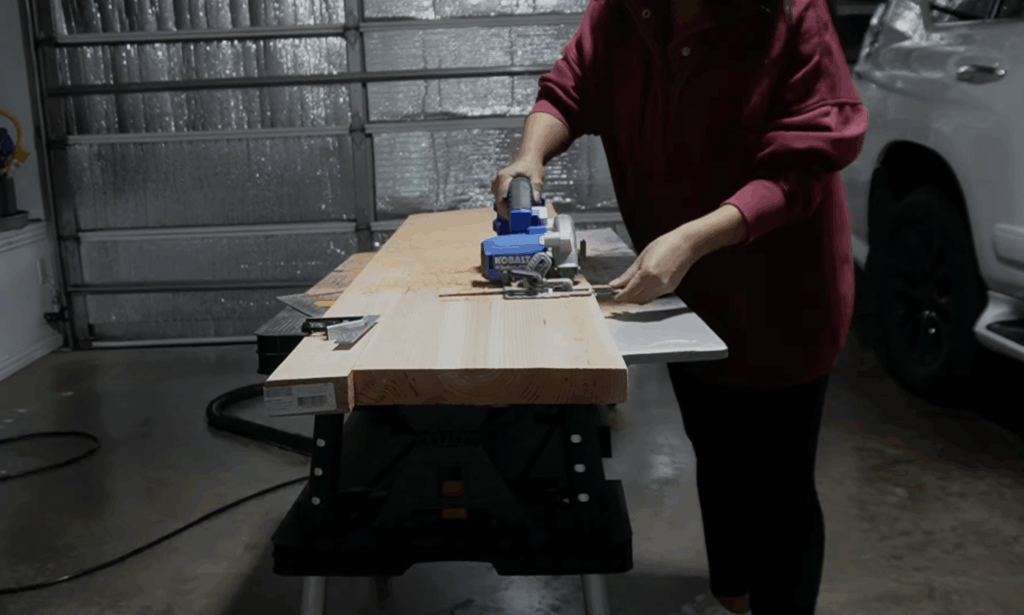
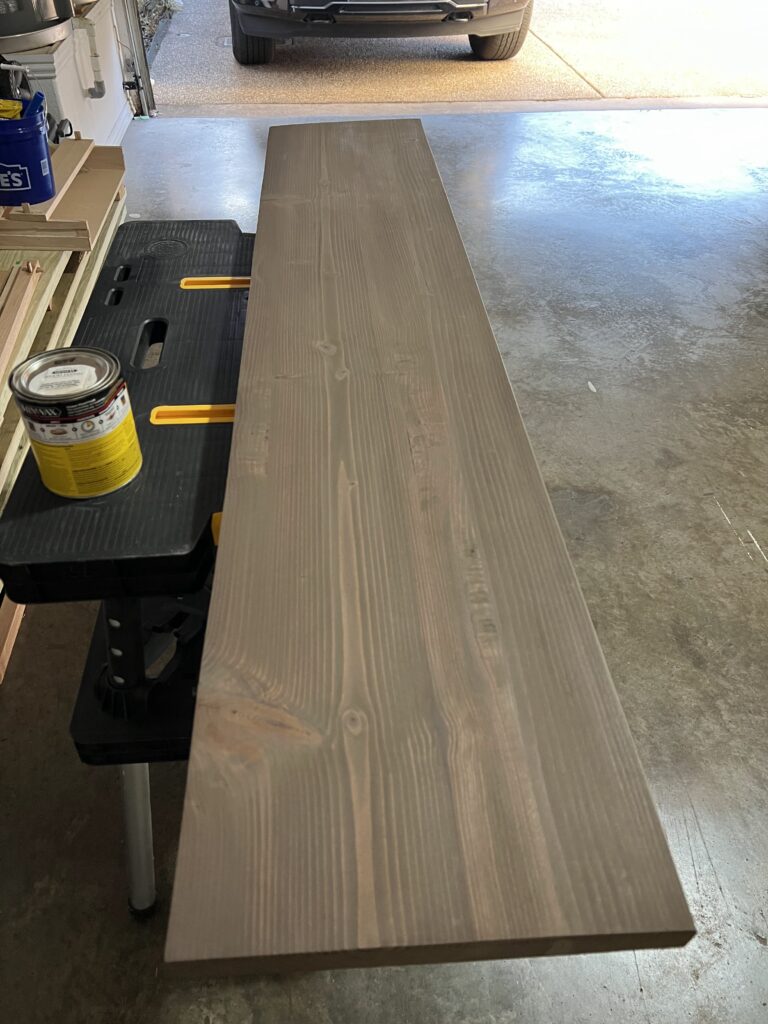
Step Six: Building the Mantel
Every fireplace needs a mantel, it’s the finishing touch that pulls the entire look together. My friend wanted something simple and clean, so I built a custom one from construction lumber I already had on hand.
I joined a 2×12 with a spare 2×4 to reach the perfect depth, securing them tightly with wood clamps and letting them dry overnight. The next day, I ran a round-over bit along the edges with my router to soften them, then smoothed the entire surface with my Mirka Sander.

For the finish, I went with a layered look that brought out the natural grain of the wood. I started with a paint wash using Fusion Mineral Paint in Algonquin, which gave the wood a warm, tan undertone. Once that dried, I brushed on two coats of Minwax Special Walnut Stain for depth and richness, and sealed everything with Minwax polycrylic topcoat in Matte to protect it.
If you love experimenting with colors and finishes like this, you can check out my favorite paints for DIY projects, it’s a full breakdown of the brands and shades I reach for most.
The result was a rustic, cozy mantel that added just the right contrast to the white trim and drywall. To attach it, I used heavy-duty corner brackets, pre-drilling each hole first to avoid cracking the wood. It was a bit of a challenge to reach underneath to tighten everything, but once it was secured, the mantel looked incredible.
Step Seven: Installing the Insert
And finally, the moment every DIYer looks forward to, installing the electric insert. After all the framing, sanding, and finishing, this step felt like magic.
I carefully slid the electric fireplace insert into the opening, plugged it into the newly installed outlet, and screwed it securely into the frame. Once the decorative crystals were placed and the glass front was attached, the whole setup instantly came to life.
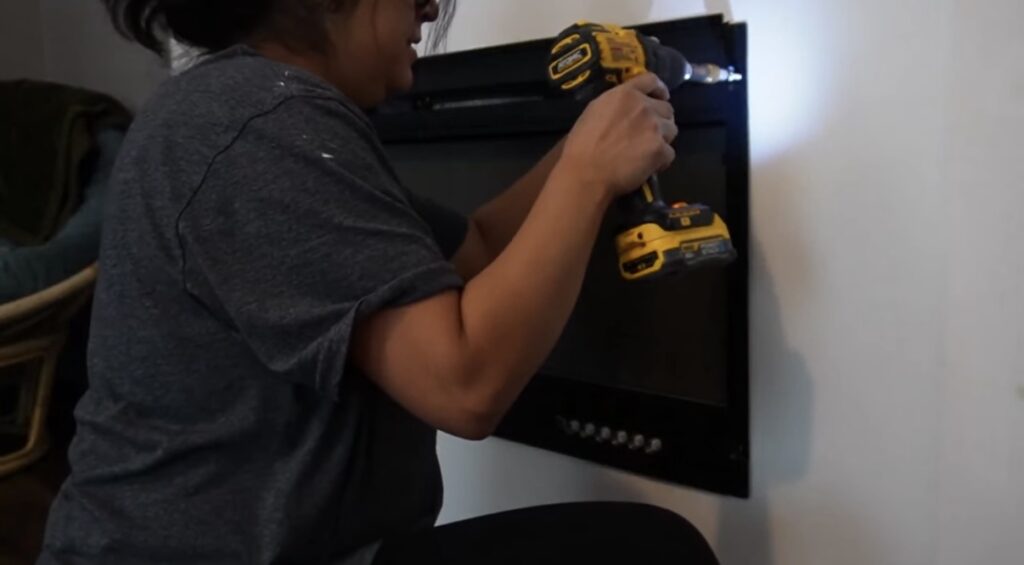
This insert had all the bells and whistles: adjustable flame brightness, multiple color options, variable heat levels, and even a timer. Everything could be controlled from the remote, which made it easy to switch between cozy warmth in winter and ambient lighting in summer.
Standing back and seeing it all come together was such a rewarding moment. What started as a blank wall had turned into a stunning feature piece, functional, beautiful, and completely custom.
Cost Breakdown
Every project budget is a little different, but here’s what to expect:
- Lumber and framing: $50-$100
- Drywall and mudding: $40-$70
- Trim and paint: $30-$60
- Mantel materials: $30-$50
- Electric insert: $150-$300
Total cost: about $300-$500 depending on the fireplace insert you choose.
The Final Reveal
When everything was complete, the transformation was incredible. The once-blank wall now had a fireplace that looked like it belonged there from the start. The trim, mantel, and insert all came together to create a polished, cozy focal point.
My friend couldn’t stop adjusting the flame colors and showing off the remote. The best part is that the fireplace can be used year-round, with or without heat.

Conclusion
Building a small fireplace with an electric insert is one of those projects that feels intimidating until you break it down. Once you take it step by step; moving outlets, framing, drywalling, mudding, finishing, and finally installing, it’s not nearly as complex as it looks.
With the right tools, a free weekend, and a little patience, you can add the warmth and charm of a fireplace to your own home. It’s a budget-friendly DIY that delivers big results.
So grab your drill, pick out an insert, and start building. Your future cozy nights by the fire are just a project away.


